Tuesday, July 31, 2012

Fresh Cut Green Beans, Sauteed with Potatoes, Bacon and Onions


This recipes is one of my favorite summer fresh creations. Filled with flavorful memories of hot summer days in the garden with mom, the crisp cut green beans snap alongside the creamy texture of the sauteed potatoes and onions.  Bacon rounds out the dish with its savory smoke flavor.   

The simple flavors of summer express themselves in perfect harmony in this basic side dish!


Sharing the dish for lunch with my son, I prefer mine with a splash of red wine vinegar and a sprinkle of scallions. My son gobbled his share right from the pan.


Fresh Cut Green Beans, Sauteed with Potatoes, Bacon and Onions

Recipe
serves 4

1 pound fresh green beans
1 medium white onion
3-4 medium potatoes
1/4 pound bacon
2 tablespoons butter
red wine vinegar
2-3 scallions
salt and pepper to taste

Method

  • Cook bacon in a large cast iron skillet over medium heat until crisp, remove bacon and all but 1 tablespoon bacon fat
  • melt 1 tablespoon butter in pan
  • add potatoes and onions and cook covered, stirring frequently until potatoes are tender but not soft.
  • add cut green beans, remaining 1 tablespoon butter, cover and cook for 12-15 minutes, stirring occasionally
  • salt and pepper to taste
  • serve with red wine vinegar, garnish with chopped scallions


DELISH!!
Print Friendly and PDF

Thursday, July 26, 2012

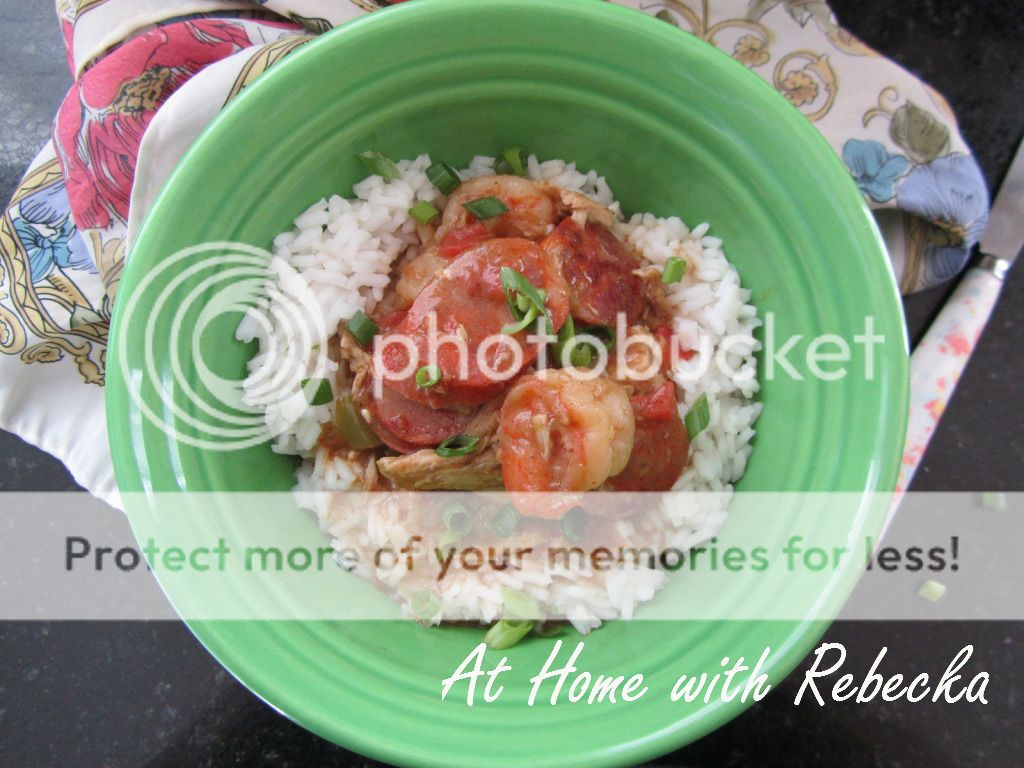
Chicken Andouille and Shrimp Gumbo


I'd like to tell you that I'm a true Louisiana girl so that you'll trust the authenticity of my Gumbo recipe however, I'm pretty much made up of English and Welsh blood; raised in New Mexico and Colorado, without a single Cajun or Creole bone in my body!   I have many dear friends that are true blood Louisiana born, Cajun and Creole cooks, all of which I'm sure will be offended by my version of Chicken, Andouille and Shrimp Gumbo!  The thing is, I like Gumbo made my way! 

Gumbo is a rich diverse dish and every true blood Cajun and Creole cook will tell you theirs is the most authentic and best Gumbo in the world.  I'll admit, I've tasted some really outstanding Gumbo in my lifetime; each as different as the next.  Gumbo is a truly satisfying comfort meal to be sure.

The key to any Gumbo is the roux.  I prefer my roux cooked to a medium dark color instead of the deep amber brown of the traditional Louisiana dish.  I also add a can of original Rotel tomatoes to the mix!  I know, this is blasphemy to the hard core purist Cajun and Creole cook!  I can only ask that you give my version a try before you judge me to harshly!!  It's delicious.

My version of Chicken, Andouille and Shrimp Gumbo.

Recipe
Serves 8-10

1 cup flour
1 cup grapeseed oil
1 1/2 quart hot water
3 tablespoons chicken base
1 whole fryer chicken, rinsed, dried and giblets bag removed
1 pound Andouille sausage
1/2 pound fresh shrimp peeled and deveined
1 large white onion
1 large green pepper
4 large garlic cloves
4 stalks celery
4 bay leaves
1 tablespoon Creole seasoning
1 tablespoon file' powder (if you use okra omit the file')
1 8 ounce can original flavor Rotel tomatoes (substitute 3 ripe large tomatoes Rotel offends your sensibilities)
hot sauce to taste
salt and pepper to taste
Garnish: 1 bunch green onions

4 cups hot cooked long grain white rice (brown rice may be substituted)

Method

Roux
  • Heat grape seed oil in cast iron skillet on medium high heat
  • add flour and whisk together
  • Continue whisking for apporxamately 20 minutes or until the roux becomes medium brown to dark amber brown.
  • Watch roux carefully, it can go from dark browned to burned in nothing flat! 
  • add chopped vegetables to the roux when it becomes medium to dark brown
  • add 1/2 cup water and cook additional 5 minutes on medium high heat
  • vegetables can be cooked seperately and then added to the stock
Gumbo
  • transfer vegetable roux mixture to a large heavy bottom stock pot
  • add remaining water, spices, hot sauce and bring to a boil, reduce heat to medium
  • add whole chicken to pot and cover, cook chicken in broth for 2 hours or until fork tender
  • remove chicken to a large plate and cool for 5-10 minutes.  When chicken is cool enough to handle remove cooked meat and discard the bones and skin
  • chop chicken into pieces and sprinkle with Creole powder, set aside
  • using the cast iron skillet the roux was made in, cook sliced Andouille sausage until browned
  • add chicken and sausage back to stock pot
  • remove bay leaves
  • peel fresh shrimp, sprinkle with Creole powder, saute in drippings from sausage until pink, about 3 minutes
  • add shrimp to stock pot and cook additional 20 minutes to bring flavors together and reheat the chicken 
Pour gumbo over hot rice and garnish with chopped green onions.  Bon appetit

Print Friendly and PDF

Tuesday, July 24, 2012

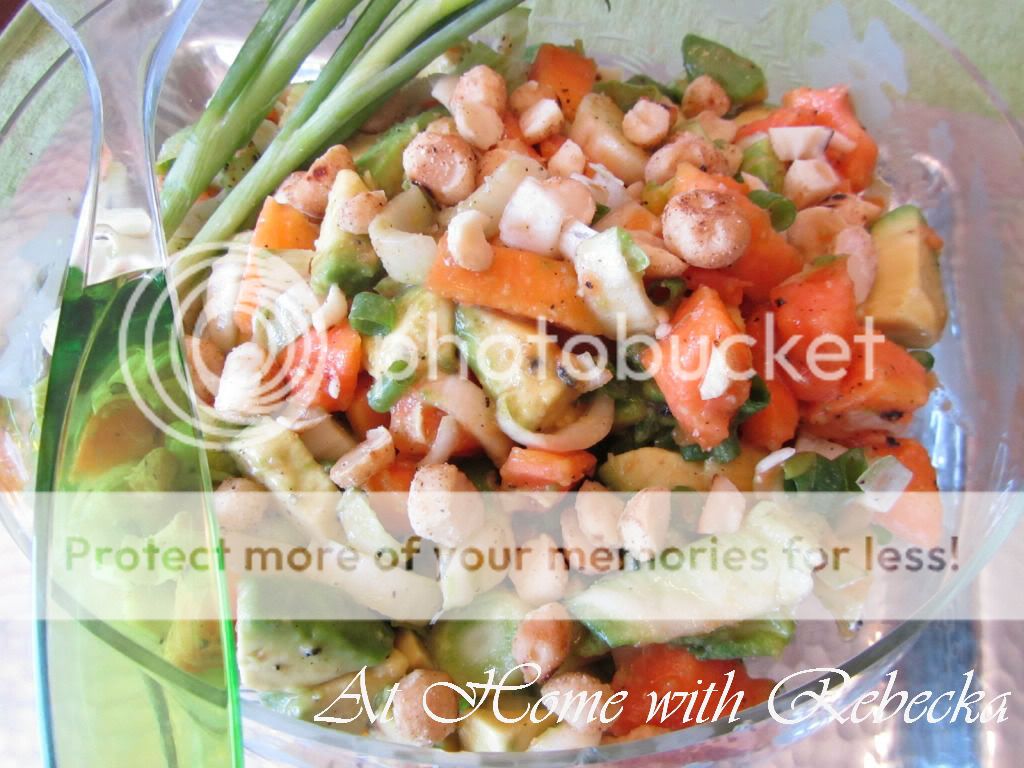
Endive Avocado and Papaya-Summer Fresh Salad


Endive Avocado and Papaya-Summer Fresh Salad

I came across this recipe, years ago while hosting a Salad Brunch for the new ladies in our neighborhood. Each women was asked to bring a favorite salad while I provided a non alcoholic sparkling punch and mimosas as our liquid libations.   I served Lemon Bars for dessert, accompanied by coffee and a varieties of hot and cold teas to round out the meal.

As the years have past, I can't seem to remember all the details from the party. I do however, remember this particular salad and I'm pretty sure the woman who brought it was named Laurie. Unfortunately, I can't promise I have her name right!

I loved the flavor combinations of this delicious salad and I certainly wasn't willing to miss the opportunity to have recipe. I begged her for the recipe on the spot, writing feverishly what she remembered on a napkin. This fresh and tasty salad has graced many luncheon tables, holiday and family meals since that time.

I've altered the recipe somewhat but the flavors remain as I remember.  The creamy texture of the avocado is balanced perfectly by the sweet pungent flavor of the papaya. The peppery bite from the papaya seeds and crispness of the endive make every mouthful a delight. The salad is also complimented by the warm rich flavor of toasted macadamia nuts! 


Recipe Serves 4

1 ripe Hawaiian papaya or 2 Brazilian papaya (about 1 pound)
2 ripe Haas avocados
2 tablespoons chopped green onion, green part only
2 cups  sliced endive
1/2 cup toasted crushed macadamia nuts


Papaya Seed Dressing

2 tablespoons fresh papaya seeds
1/3 cup rice vinegar
2 tablespoons brown sugar
1/4 cup grape seed oil
1/4 teaspoon dry yellow mustard
1/4 teaspoon sea salt
3 tablespoons chopped Maui onion


Method
  • cut papaya in half and remove seeds, reserve 2 tablespoons seeds
  • in a food processor or blender, combine all dressing ingredients and papaya seeds, process on high until seeds resemble cracked black pepper
  • peel papaya and cut flesh into cubes.  Peel avocado and cut into cubes. Slice endive crosswise removing root end, discard end.  Chop green onions.
  • add 1/4 cup dressing and toss ingredients together in a large bowl.  Serve remaining dressing on the side
  • toast macadamia nuts for a few seconds in a dry heavy bottom skillet, watch closely so not to burn.  Place toasted nuts in a zip lock bag and lightly pound with a mallet until coarse.  Garnish salad with nuts, serve.
A few special notes about the recipe:

I've tried adjusting the amount of papaya seeds and find that using more than 2 tablespoons adds a bitter taste to the salad, less than 2 tablespoons and the delightful peppery flavors are lost.

Also, the delicate nature of the ingredients makes this dish one that needs prepared right before serving.  If you plan to take the recipe to an outing be sure to separate all the ingredients into plastic containers and toss together right before the meal.

ENJOY!

Print Friendly and PDF

Tuesday, July 17, 2012

Fried Green Tomatoes


This is my favorite version of fried green tomatoes. There are other recipes that call for eggs and making more of a batter and deep frying just too heavy for me.
 
Fried Green Tomatoes
 
4-6 green tomatoes sliced thick
1 cup flour
1/2 cup corn meal
1 teaspoon salt
1 teaspoon pepper
1 cup butter or vegetable oil

Method
Slice tomatoes thickly, in a medium bowl mix dry ingredients, flour both sides of a tomato and place in a hot skillet, repeat until your skillet is full but the tomatoes aren't to crowded.


Cook on first side for 3-5 minutes without turning, flip over and cook the other side 3-5 minutes. The idea is to creat a very brown crisp crust without loosing any of the flour mix. Season with salt and pepper taste.


Serve alone or as a side dish, YUM!!
Print Friendly and PDF

Thursday, July 12, 2012

Canning Pepper Jelly


I've decided to share a few of my favorite recipe posts from the At Home with Rebecka Recipe Vault, while I'm vacationing with family in Philadelphia, New York and Washington DC next week. 

To begin the week...Pepper Jelly. 

Pepper Jelly is not only a great Christmas gift but a delicious summer treat. I find it difficult to stop eating this addictive snack, and crave the sweet hot flavors with a creamy block of Philadelphia Cream Cheese.  I's that time of year so I think it's time to head out the the farmers market to buy a bunch of peppers!  Enjoy
 
Hot Pepper Jelly

When socializing during the Holidays or attending parties, and special events anytime of the year, I never arrive empty handed. Popular hostess gifts such as a nice bottle of wine or fresh cut flowers are a nice touch, but I try to take a different approach and make my gift a little more personal. I share a sweet jar of one of my homemade jellies, jams or chutney's

The bright red color of the crisp peppers is deliciously inviting, so I choose red, orange and yellow sweet peppers for my Pepper Jelly recipe.

Tasting the combination of sweet, hot pepper jelly on a crisp Water Cracker brings back memories of Christmas' long past and summer canning projects with my children.  Canning Pepper Jelly each year has become my signature Christmas gift for family and friends alike.

I also prefer my jelly very hot and add 3-4 habanero peppers to the hot pepper mix. It's easy to adjust the heat by using Jalapenos instead. I generally use two or three different varieties to bring a fuller flavor to the recipe.

Recipe
4 to 6 red or green sweet peppers
6 to 10 hot peppers habanero, jalapeno
6 cups sugar
1 1/3 cups white vinegar (5% acidity)
2 3-ounce packages liquid pectin
2-3 drops food red or green coloring (optional)

Method


  • Wash the peppers and remove seeds and ribs, and cut into chunks. Process each type of pepper in batches, in a food processor until coarsely ground.
  • Measure 1 cup ground sweet red pepper and 1/3 cup ground hot peppers.
  • Combine ground peppers, sugar, and vinegar in a large saucepan; bring to a boil.
  • Boil 6 minutes stirring frequently.
  • Stir in pectin and boil 3 minutes, stir frequently.
  • Remove from heat and skim off foam.
  • Pour hot jelly into hot sterilized jars, leaving ¼ inch. Wipe jar rims with clean damp cloth. Cover with metal lids and screw on bands; Process in water bath for 5-10 minutes. Makes 6 half pints.
My recipe has been adapted throughout the years but it's origins are founded in the Household Search Light Recipe Book and Fannie Flagg's Whistle Stop Cafe Cookbook.

Pictured: Recipe Extra Hot Habanero Pepper Jelly
Click photo for recipe


You might also like to read Mount Vesuvius Erupts in my kitchen .  A tale of canning gone wrong, with a happy ending!

  Print Friendly and PDF

Friday, July 6, 2012

Creamy Lemon Bars and Thick Chewy Chocolate Chip Bars


This years 4Th of July festivities were extra special for me as we were surrounded by all of our children and our new grand baby.  Although, the fire ban in Colorado kept us from using or watching fire work displays, we managed to have an amazing time eating grilled burgers and hot dogs and playing our traditional family Monopoly game. 


My Creamy Lemon Bars recipe, is from the Barefoot Contessa Cookbook and the Thick and Chewy Chocolate Chip Bars from fellow food blogger, Real Mom Kitchen!  Both are simple recipes with top notch flavor!


Lemon Bars

Ingredients

For the crust:

  • 1/2 pound unsalted butter, at room temperature
  • 1/2 cup granulated sugar
  • 2 cups flour
  • 1/8 teaspoon kosher salt

For the filling:

  • 6 extra-large eggs at room temperature
  • 3 cups granulated sugar
  • 2 tablespoons grated lemon zest (4 to 6 lemons)
  • 1 cup freshly squeezed lemon juice
  • 1 cup flour
  • Confectioners' sugar, for dusting

Directions

Preheat the oven to 350 degrees F.

For the crust, cream the butter and sugar until light in the bowl of an electric mixer fitted with the paddle attachment. Combine the flour and salt and, with the mixer on low, add to the butter until just mixed. Dump the dough onto a well-floured board and gather into a ball. Flatten the dough with floured hands and press it into a 9 by 13 by 2-inch baking sheet, building up a 1/2-inch edge on all sides. Chill.

Bake the crust for 15 to 20 minutes, until very lightly browned. Let cool on a wire rack. Leave the oven on.
For the filling, whisk together the eggs, sugar, lemon zest, lemon juice, and flour. Pour over the crust and bake for 30 to 35 minutes, until the filling is set. Let cool to room temperature.
Cut into triangles and dust with confectioners' sugar.

Ina Garten is flawless in the kitchen and my most admired chef of all time! Thus, she is at the top of my list when searching for recipes. If you're in the mood for a perfectly creamy Lemon Bar this recipe is by far the easiest to make and best I've ever tasted! 


Thick and Chewy Chocolate Chip Cookie Bars


  • 2 1/8 cups (10 1/2 ounces) all purpose flour
  • 1/2 teaspoon salt
  • 1/2 teaspoon baking soda
  • 12 tablespoons butter (1 1/2 sticks), melted and cooled slightly
  • 1 cup (7 ounces) light brown sugar
  • 1/2 (3 1/2 ounces) cup granulated sugar
  • 1 large egg
  • 1 large egg yolk
  • 2 teaspoons vanilla extract
  • 2 cups chocolate chips
  1. Preheat the oven to 325 degrees. Adjust the oven rack to lower-middle position.
  2. Line a 9X13-inch baking pan with foil, letting the excess hang over the edges of the pan by about 1 inch so you can grab those edges and pull the brownies from the pan after they have baked. Spray the foil-lined pan with nonstick cooking spray.
  3. Mix the flour, salt, and baking soda together in medium bowl; set aside. Whisk the melted butter and sugars in a large bowl until combined. Add the egg, egg yolk, and vanilla and mix well.
  4. Using a rubber spatula, fold the dry ingredients into the egg mixture until just combined; do not overmix. Fold in the chocolate chips and turn the batter into the prepared pan, smoothing the top with the spatula.
  5. Bake until the top of the bars is light golden brown, slightly firm to the touch, and edges start pulling away from sides of pan, 24-28 minutes. Cool on a wire rack to room temperature.
  6. Remove the bars from the pan by lifting the foil overhang and transfer them to a cutting board. Cut into 2-inch squares and serve.
Visit realmomkitchen.com for more amazing recipes!  Print Friendly and PDF

Tuesday, July 3, 2012

Aarón Sánchez, Telluride Wine Festival 2012


I had the honor of a quick photo op with renowned Chef Aarón Sánchez this past weekend.   

The co-star of Food Network's hit series', Heat Seekers and Chopped, Aarón is the chef/owner of Centrico Restaurant and Tacombi, located in New York City, as well as Mestizo Restaurant, located in Kansas City. Aarón's passion, commitment and skills
have placed him among the country's leading contemporary Latin Chefs.

He is the author of "Simple Food, Big Flavor: Unforgettable Mexican-Inspired
Recipes from My Kitchen to Yours" and "La Comida del Barrio: Latin-American
Cooking in the U.S.A."

Aarón is a restaurateur, television personality, consultant, spokesperson and author. Source: Chef Aarón Sánchez.com

I was taking a tour of Telluride Colorado, during the Annual Wine Festival when my son Dustin spotted Aarón doing some sight seeing and shopping.  Honestly, I had walked right past him a few seconds earlier without making the connection.

I'm generally reluctant to bother celebrities when they are trying to enjoy a day without fans pouring all over them. However, I always look back with disappointment because I didn't have the gumption to stalk the poor celebrity and get photo evidence of the moment.   So, this time I did the unthinkable and ran across the street like a silly school girl, to capture a moment on film with Aarón. 

When I asked if he wouldn't mind taking a photo, Aarón was exceptionally kind and accommodating although, he didn't have any place to hide as I had him cornered in a T-Shirt store. 

Thank you Aarón for taking time from your day to snap a quick photo with me!!


From left: Pat, Dustin, Grayson, Christa and Becka

We had some great food and a wonderful day with family!


From left: Christa, Dustin, Blake and Becka
Print Friendly and PDF

LinkWithin

Related Posts Plugin for WordPress, Blogger...
BlogWithIntegrity.com